Part 5, Loading the code
This is a series of videos showing you how to build your own robot, from start to finish, step by step.
- Week 5 - Loading the code
- What you’ll need for week 5
- Previous SMARS code sessions
- Some new Code - Follow Me
- One code to rule them all - #define
Week 5 - Loading the code
This session will look at loading the code into the SMARS/Arduino using the Arduino IDE and some code.
Here is a link to the Keynote presentation as shown in the video.
What you’ll need for week 5
For this week’s Loading the code session you will need:
- The assembled robot with electronics wired up
- A computer with the Arduino IDE installed
- A USB Cable
Previous SMARS code sessions
- Movement - move forwards
- Avoid - move, detect objects, turn around
- Remote control - with bluetooth & a phone
- Line follow - follow a line round a path
- Servos & PCA9685 - Using servos
- MPU6050 / GY-271 - Positioning Sensors
Some new Code - Follow Me
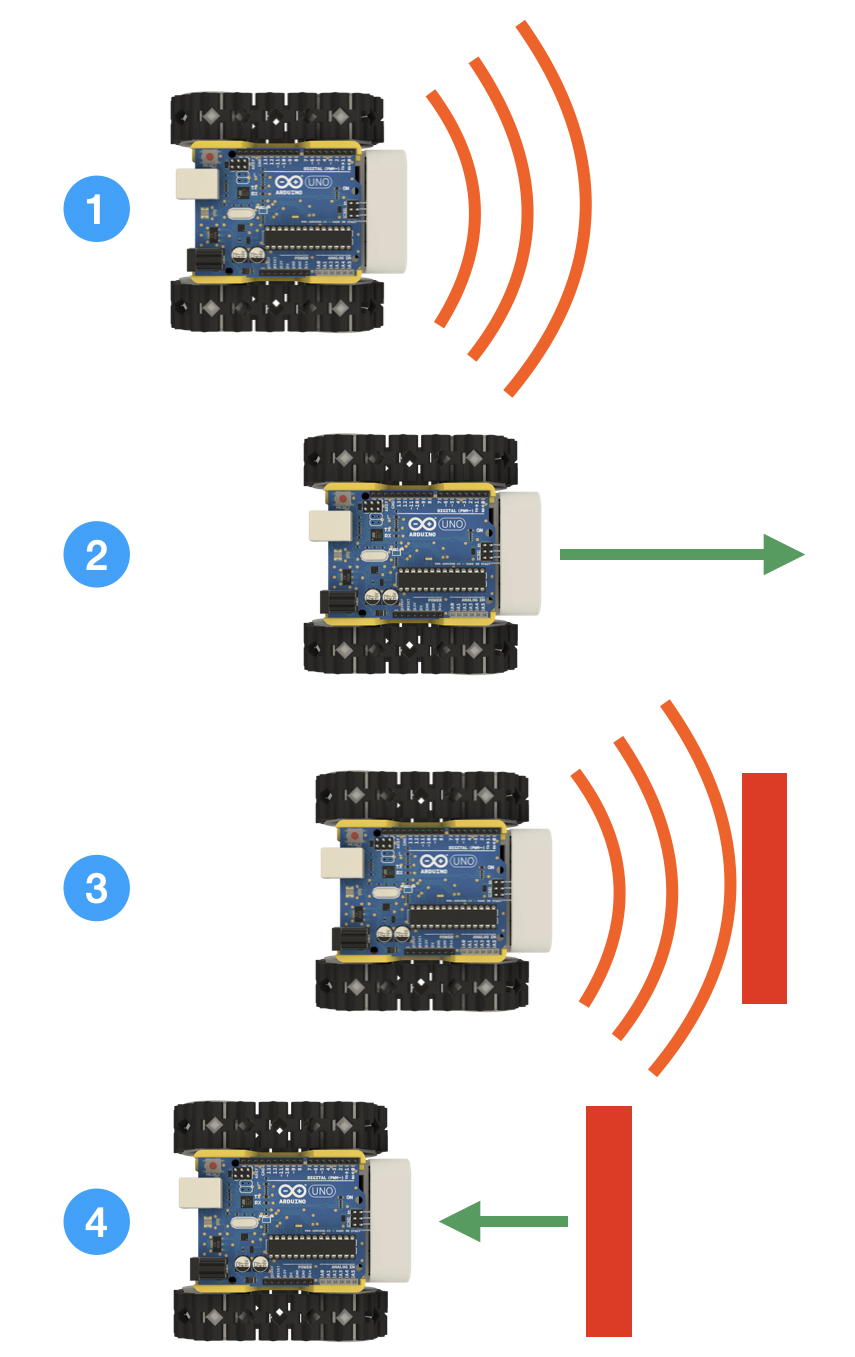
The follow Me code will:
- Measure the distance
- Move forward if distance is > 10cm
- Stop if the distance is between 5cm and 10cm
- Move backward if the distance is < 5cm
You can download the code from this link: https://github.com/kevinmcaleer/follow_me2
/*
* Follow me code
* Kevin McAleer 23 September 2020
* Updated 26 September 2020 - delay is shorter
* Updated 04 October 2020 - added the beep and definitions for official and fundomoto motorshields
*/
// Uncomment the define below to select the right board
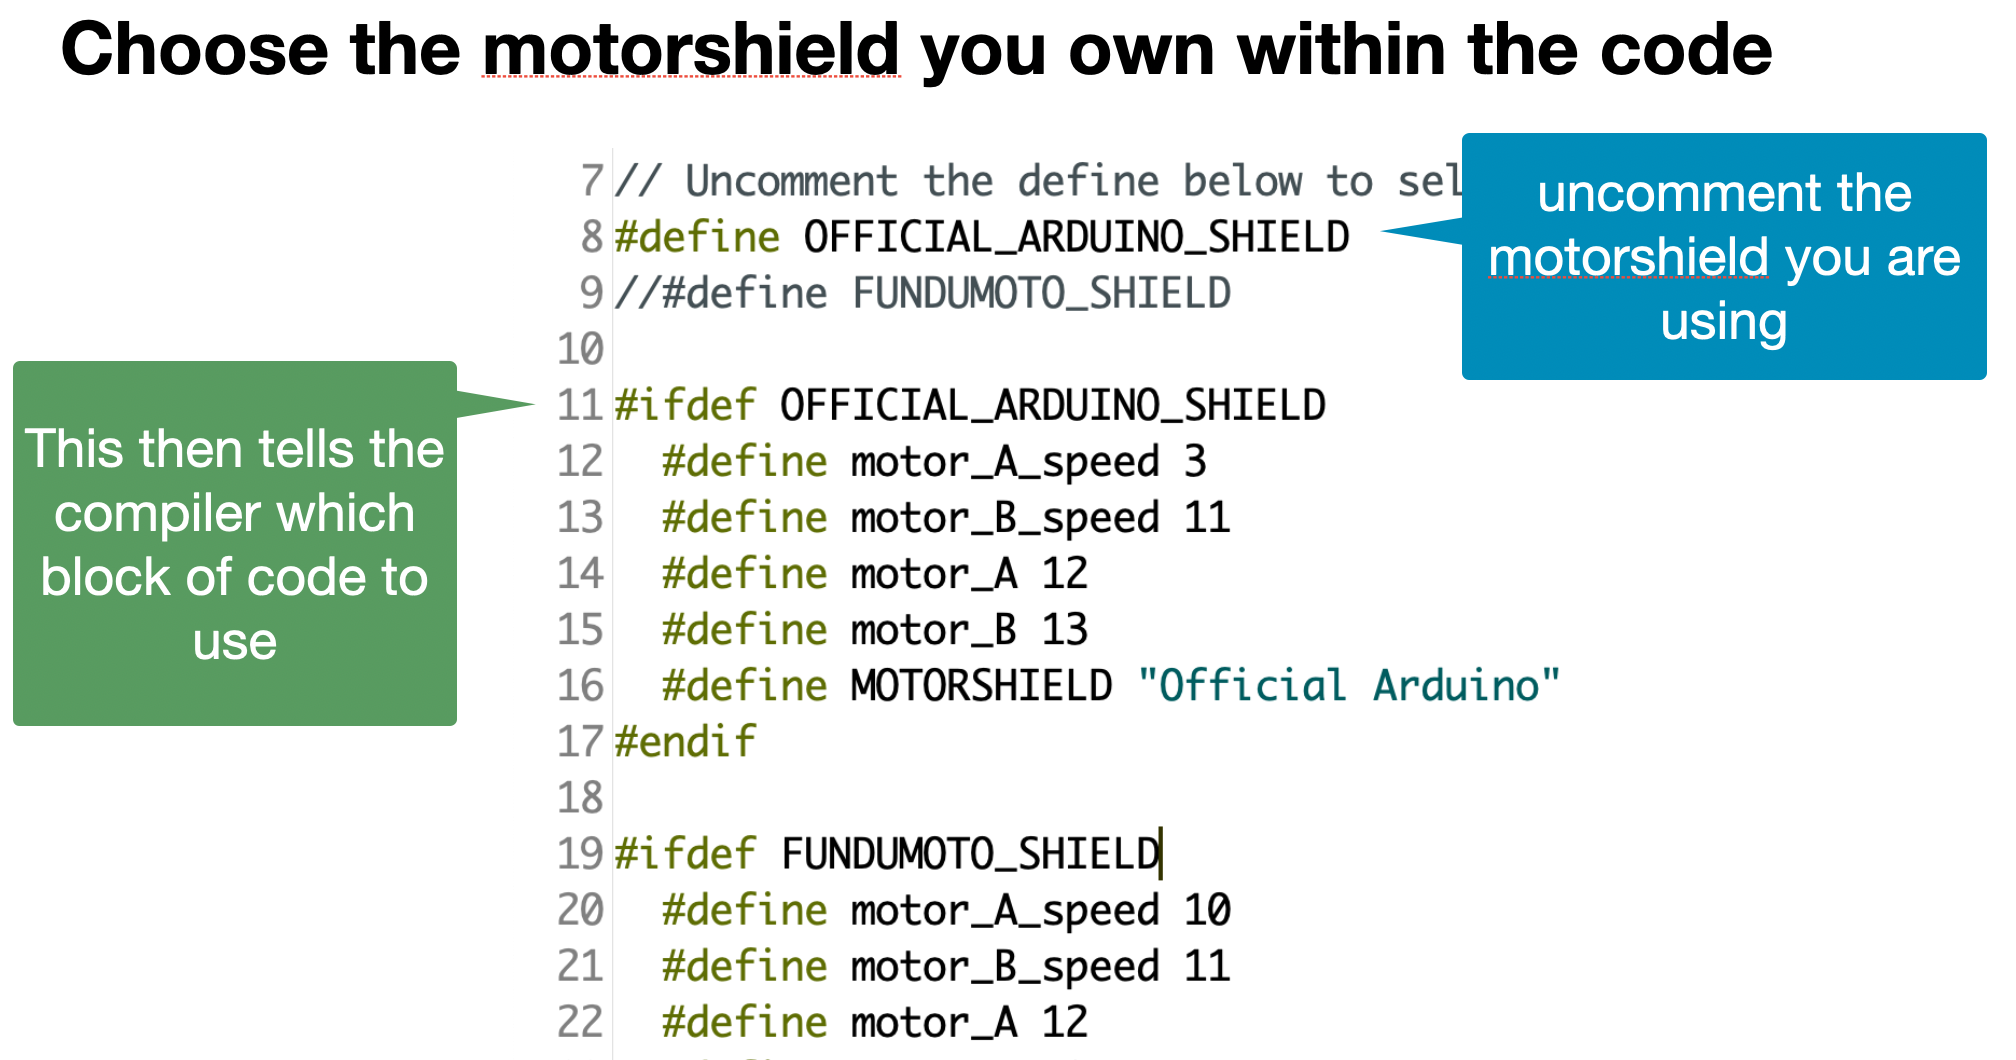
#define OFFICIAL_ARDUINO_SHIELD
//#define FUNDUMOTO_SHIELD
#ifdef OFFICIAL_ARDUINO_SHIELD
#define motor_A_speed 3
#define motor_B_speed 11
#define motor_A 12
#define motor_B 13
#define MOTORSHIELD "Official Arduino"
#endif
#ifdef FUNDUMOTO_SHIELD
#define motor_A_speed 10
#define motor_B_speed 11
#define motor_A 12
#define motor_B 13
#define buzzer 4
#define MOTORSHIELD "Fundumoto"
#endif
// defines pins numbers
const int trigPin = 7;
const int echoPin = 8;
// defines variables
long duration;
int distance;
// set the time between motor on and motor off
int wait_in_milliseconds = 50;
int ping() {
// Clears the trigPin
digitalWrite(trigPin, LOW);
delayMicroseconds(2);
// Sets the trigPin on HIGH state for 10 micro seconds
digitalWrite(trigPin, HIGH);
delayMicroseconds(10);
digitalWrite(trigPin, LOW);
// Reads the echoPin, returns the sound wave travel time in microseconds
duration = pulseIn(echoPin, HIGH);
// Calculating the distance
distance= duration*0.034/2;
// Prints the distance on the Serial Monitor
// Serial.print("Distance: ");
// Serial.println(distance);
return distance;
}
void beep(int distance) {
// beep the buzzer
#ifdef buzzer
digitalWrite(buzzer, HIGH);
delay(wait_in_milliseconds / (distance*2));
digitalWrite(buzzer, LOW);
#endif
}
// move forward
void forward() {
Serial.println("Forwards");
// set the direction to forward
digitalWrite(motor_A, HIGH);
digitalWrite(motor_B, LOW);
// set to full speed
analogWrite(motor_A_speed, 255);
analogWrite(motor_B_speed, 255);
// wait
delay(wait_in_milliseconds);
// stop
analogWrite(motor_A_speed, 0);
analogWrite(motor_B_speed, 0);
}
// move backward
void backward() {
Serial.println("Backwards");
// set the direction to backward
digitalWrite(motor_A, LOW);
digitalWrite(motor_B, HIGH);
// set to full speed
analogWrite(motor_A_speed, 255);
analogWrite(motor_B_speed, 255);
// wait
delay(wait_in_milliseconds);
// stop
analogWrite(motor_A_speed, 0);
analogWrite(motor_B_speed, 0);
}
void setup() {
// put your setup code here, to run once:
Serial.begin(9600);
pinMode(trigPin, OUTPUT); // Sets the trigPin as an Output
pinMode(echoPin, INPUT); // Sets the echoPin as an Input
// set the Arduino pin to OUTPUT mode
pinMode(motor_A, OUTPUT);
pinMode(motor_B, OUTPUT);
// if there is a buzzer, set th epin mode
#ifdef FUNDUMOTO_SHIELD
pinMode(buzzer, OUTPUT);
beep(10);
#endif
Serial.println("SMARS Robot - Follow Me code");
Serial.print("Motorshield type: ");
Serial.println(MOTORSHIELD);
}
void loop() {
// put your main code here, to run repeatedly:
// check distance
distance = ping();
Serial.print("Distance ");
Serial.println(distance);
if (distance < 5) {
Serial.println("backwards");
backward();
}
if (distance > 10) {
Serial.println("forwards");
forward();
}
if ((distance >= 5) and (distance <= 10)) {
Serial.print("stay still");
}
beep(distance);
// if less than 5cm then move backward
// if greater than 5 cm then move forward
}
One code to rule them all - #define
You can use a special command in the arduino IDE to tell the compiler that based on the value of a defined setting, to execute a specific block of code, with out having to rewrite everything. This is a bit ‘meta’ in that you’re programming the compiler to program the arduino!