Node-Red Automation
28 March 2021 | Kevin McAleer
Node-Red Automation
This is a transcript of the Live Stream show, recorded on 28 March 2021.
Hey, Robot makers, how are you doing? Are we having a good day so far? Today’s show is all about Node-Red and automation. If you’ve built any robots or any kind of sensors , and you think, how do I get that data to do something useful? Today’s show is really useful to you.
Let’s dive straight in.
My name is Kevin. Come with ways we build robots, bring them to life with code and have a whole load of fun along the way.
Today’s session. We want to learn what Node-Red is. We want to learn about what MQTT is.
You’ll learn a lot by that today. We’ll look at a simple, weather station. I’ve got one on my desk here that we can have a look at and see how all this fits together. We will build a Node-Red flow and a dashboard. You can get the dashboards on your mobile phone anywhere on your local network.
Very easy trivial to do. And we’ll look at how to load micro Python onto an ESP eight, two, six, six. otherwise known as a node MCU. So I’ve got a couple of them here because I use these in my projects. Simple because they have wifi built in that really helps us little projects. They’re internet of things type related.
I would say this is a level beginner because we were talking about some quite straightforward concepts. Even though there might be some acronyms and things, I’ll explain what all those mean. Let’s get over to Node-Red. What is this all about? So Node-Red is a flow-based programming tool originally developed by IBM.
It’s by British developer. Actually, I’ve seen quite a few . Of the videos of the guy. Who’s either the lead developer or the inventor of Node-Red. His idea, if you’ve got some node, red.org, you can download the code there, you can learn more about it. And it’s one of these pieces of software that’s under continual development.
So whatever you see online is probably moved on by then if you’re watching this maybe a year from now, it’ll probably have developed even further, but it’s totally awesome. So let’s have a look a bit more detailed what it is. What is a node? You can see on screen there. We have these little lozenges, these little rectangular blocks on the screen that are connected together by what like noodles by bits of spaghetti.
And the idea is that these things create a flow. So things go from one node to another node. It does some kind of function or operation on it, and then it passes it to the next one down the chain. And it may have several inputs some have several outputs. And depending on what the node that you’ve picked from the pallet of nodes that’s available, it will do your bidding.
It’s very visual. I quite like the way this works similar in style to things like scratch. Although instead of it being top to bottom, this is left to right. this is how we create and read these diagrams. So the data comes from a source we then pass it into a node, or it’s emitted from a node that we select from my palette and each node performs a function.
And then the collection nodes would generally call that a flow and we can have several flows as well. All interconnected. So a quick tour of the node interface. We’ll have a look at it for real in a minute, but I just want to give you a quick overview of what all the different parts mean. It is quite straightforward and well laid out.
So on the left-hand side, we have a node pallet and that’s where you’ll find all those little losenge shape things, which are the nodes. The main part, the screen is where the flow is. And at the top of there’s some tabs. On the right hand side, we have some information configuration and some debug panes
they slide in and out as needed. And at the very top we have a button that’s called deploy. Now, when I first started using this, I was like, why’d, you have to keep deploying things. And the idea of this is you can work on something and when you’ve got it working, you can then click deploy.
And that version is then what’s produced. What’s active in real life. They’ve since built into this things like source code control using git so you can rewind or reverse some of your projects that you make a mistake, but it’s very forgiving. It’s quite simple interface, very easy to get started with this.
We are also going to be talking today about some Q and A’s from the Facebook group. I’m actually going to do that a little bit later on. If you’ve got any questions and answers, put them in the chat and I’ll come to them It’s a bit later on in the show.
Just put Q in front of it makes it easier for me to scroll through as I’m doing all this by myself. So dashboards. One of the cool things about Node-Red is once you’ve created these flows and you’ve got the kind of mechanics in the background of things work, and you’ve got data flowing in doing something to it and it’s spitting out somewhere, would it be really nice to graphically show that data so you can either chart it?
You can have these, what I’ve got on screen at the moment is some little pie charts, little doughnut charts that are showing humidity. And there’s a temperature on that. Also goes with this and these are very easy to put together and then view on your mobile phone or tablet or PC. And if you’re clever, you can make these work over the internet as well.
And these were updated in pretty much real time. So Node-Red makes all this very trivial to do building dashboards connecting data from your robots, from your sensors, very straightforward. And we’ll have a play with that in a minute. We’ll do a bit of demo. So these can be used to trigger other events as well.
It works both ways. The dashboard is just like a read, only view. You can have buttons on there and sliders, so you can interactively push events back to your robot. You could, for example, build a dashboard, that’s got a slider on it, and that slider might make the, the bucket SMARS robot move up and down, or it might make the robot move backwards and forwards.
Or it might be that you have a button that presses a light and makes the light go on and off, for example. Just as an aside, I created quite a bit of home automation using Node-Red. I’m using the stuff I’m going to be showing you today, MQTT and something called HomeBridge. And it enabled me to get headstart of what was now quite common, where you have home automation through your mobile phone, you can select a scene.
When I come into this robot lab, I can press a button on my stream deck and the lighting will all adjust to the perfect lighting for broadcasting. I might have a different one for sort of a morning coffee. I might have another one for I don’t know, different points during the day.
I’ve got to meet it. I know when it can be less distracting, so I’ve got lots of different scenes set up there and I can just press a button, make them happen. And what I did in in the house was we had a heated mirror in the bathroom and we had a fan that came on when you switch the light on.
And I didn’t like the fact that this fan would stay on as long as the light was on. And if you switch the light off, it would stay on for another 15 minutes. I put a device that’s called sonoff this is a sign-off stands for software on, off, and essentially inside this it’s a little plastic device I’ve got here. It’s got some mains that’s comes in one side and mains goes out the other side. And if I can just get this thing apart I’ll show you what it looks like inside. So there is just a little circuit board.
With two header pins designed for mains electric and in the middle, we’ve got a tiny little chip on the back. We’ve got some circuitry as well, some relays and transformers and things. So what happens here? There’s a little clickable button there, and there are some header, pins is five header pins there.
And this is actually just an Arduino type chip. You can use the Arduino IDE to program this yourself. And that’s exactly what I did. I created some code that would turn the mains on or off, depending if it was a signal sent to it. And just like the node MCUs that we’re looking at today. Cause it’s more like an NodeMCU, if I’m honest this has wifi built in.
A little wiggly line just on the side of the circuit there. And that is actually the wifi antenna for this. I built some code that connects this to the local wifi. It listens on a MQTT server, which we’ll get into in a minute and it listens for specific events happening such as turn light on, turn fun off that kind of thing.
And then I then exposed those on off events through something called HomeBridge, which we’ll get into in a minute. And then that was able to then translate that into something that my Apple phone would be able to listen to. And it could then make a button appear on my phone and I could press that button to make the fan go on and off.
And then I could do things like automation. I could say, don’t turn the fan on. If it’s past 10, am 10:00 PM in the evening what makes sure you can turn the fan on from 6:00 AM in the morning and if the heat has been on the heated mirror has been on for more than say an hour, switch it off, all that kind of logic you can do in the Apple home app or in Node-RED.And you can also capture all this data as well and put it in a spreadsheet like a Google sheet, if you wanted to. I’m going to look at a bit more of that, how we do home automation stuff. But with a view to, how integrate this to robots. Dashboards is one way we can quickly build interfaces for that.
So the raspberry PI is an ideal device for building internet of things, IOT. It’s got all these header pins that we can connect things to. It has wifi. If you buy the model that has wifi on the zero and Node-Red exposes those GPIO pins in Node-Red. It means we can very easily connect things like led switches directly to our raspberry PI.
If we wanted to do some experiment. I have in my little drawer a bit next to me here.
I have a sense hat, which is the official raspberry PI Device hat they call it, it plugs onto the top of the raspberry PI it’s I’ve got a zero I’m just holding now. So it just connects through to the head of pins there. It’s got a little led matrix , but it has a whole lot of sensors.
It’s got a little joystick you can do up and down left and right. It has a humidity sensor. It’s got a temperature sensor, pressure sensor all of all the sensors. And that means that we can take that data through Node-Red and we can do things with it.
And that’s exactly what I’m going to show you in a minute on the overhead. So all the things raspberry PI is really on the money when it comes to cool technology and integrating with things. Node-Red comes installed, I think automatically on the raspberry PI, if you choose the full desktop version, but it’s very easy to install and it’s in the list of recommended software.
We can have a look at that as well. So MQTT this is a technology that I’m really interested to show you. You might not have heard of this. It’s a messaging protocol. It stands for message queue, telemetry transport, and on the screen, there’s a little animation there of a satellite just passing by.
And that’s because this was originally developed for collecting telemetry information from satellites and controlling them in orbit, as well as monitoring oil pipelines. Things where there’s a great deal of distance. But you want to get as real-time information as possible. The protocol is very lightweight, very simple to implement and use it’s all open source.
So it’s ideal for the kind of lightweight message passing that we’re interested in. You’ll hear people talk about a MQTT broker, an MQTT client. It uses the publish and subscribe pattern. Publish and subscribe. If you think about magazines, for example somebody will publish a magazine and you will subscribe to that.
So whenever they have a new issue, you’ll get that because you’re subscribed to it. It’s a one way of understanding if events have happened, if new messages have occurred and because we might have more than one type of message, there’s an idea called a topic, and it’s a bit like a channel.
So you’ve got all the different channels of communication that you might want, and you can just subscribe to one topic on that. And topics are very, again, lightweight, they’re created on-the- fly. You don’t need to build it in advance, configure it. When you send a message, you send it on a topic and if you’re subscribed, you subscribed to that topic.
Because they’re going into the same server, you’re both being communications, very easy to create build up and tear down these things very simply. The other clients can subscribe to a topic and received messages posted to those topics. And the messages contain what’s known as a payload.
So the payload is the thing that you’re interested in. It might be the data and it’s usually structured in such a way that whoever is receiving it knows how to deal with it. Typically we use things like JSON objects, JavaScript object notation, which is curly braces. And it’s a very specific way of writing data and passing that between two things.
So because of the internet that uses JSON all the time. That’s the kind of thing that’s in the payload, but it doesn’t have to be, it could be binary. It could be whatever you want it to be, could just be pure text. But the message has a little header on there which contains who it was from.
What quality of service. We don’t need to get into that because this beginner’s one, but it will, it has header information that you don’t really care about, but just make sure the message gets to you. And then there’s the payload, which is what you are interested in. Like I said, very easy to implement.
We’ll have a look at that in a minute. And was originally developed for monitoring satellites and oil pipelines. We’re going to use that. I have one of these running in my home as well on a raspberry PI works very reliably no fuss so how do we connect all these things together?
On the screen at the moment, I’m showing a diagram which has our robot on the left-hand side, it’s going to connect to our MQTT server. So that means that we’ll probably need something that can communicate via Bluetooth to something that could receive that and then put that onto the network, or it has native wifi itself.
So maybe a node MCU or an ESP 32 or any kind of chip, like a raspberry PI that’s has wifi built on. That’s going to pass the message to the MQTT server and the message that it might send is that it’s detected a face or a button has been pressed or some telemetry information. And what I mean by telemetry is, what’s the range finder sending those back as a, in the way of data.
That’s the kind of thing that we can collect from our robot, the MQTT broker, will pass that message on to anybody that subscribed to it. The kind of things that we can connect to is our Node-Red server that can listen to MQTT topics.
And it can do things with them when they get passed in .There is also the if this, then that, or we’ll have a look at that slightly later on in the show and there is something called HomeBridge as well. All these received those MQTT messages and can do things with them. And the HomeBridge one is the one that can connect it.
If you have an Apple device to your Apple network, if you use, if this, then that or Node-Red, you can connect that to Alexa devices, as well as Google home devices as well. But Node-Red has by far the most number of things that you can configure yourself. If this, then that requires a subscription, but is available over the internet. So Node-Red isn’t typically exposed of the internet. But you could make that happen. There is ways and means,
it can build lots of interesting apps, dashboards, data loggers, very easily. With our Node-Red, we can log things to databases and spreadsheets. Very simply, trivially I would say the issue there is if you’d log data to a file, and then you forget about it, it’s just going to fill up whatever device that’s on, because you’ll forget about it because it works so reliably.
And then you’ll think why has that thing stopped working? And it’s probably because that the log files full. So we might need to think about things like round Robin log files. They never quite get full right to gets to the end of the agreed file size and then goes back to the top and then started writing again.
How do we connect MQTT to Node-Red? It’s a node, there’s a node that’s called the MQTT in node. And we can connect that. We configure it by just clicking into it. We’ll have a look at that in a minute on the demo. And there’s some options in there such as what is the MQTT server that we’re connecting to the broker, what’s the topic we’re listening to and what’s our client name so that the server knows who we are, which messages we’re interested in.
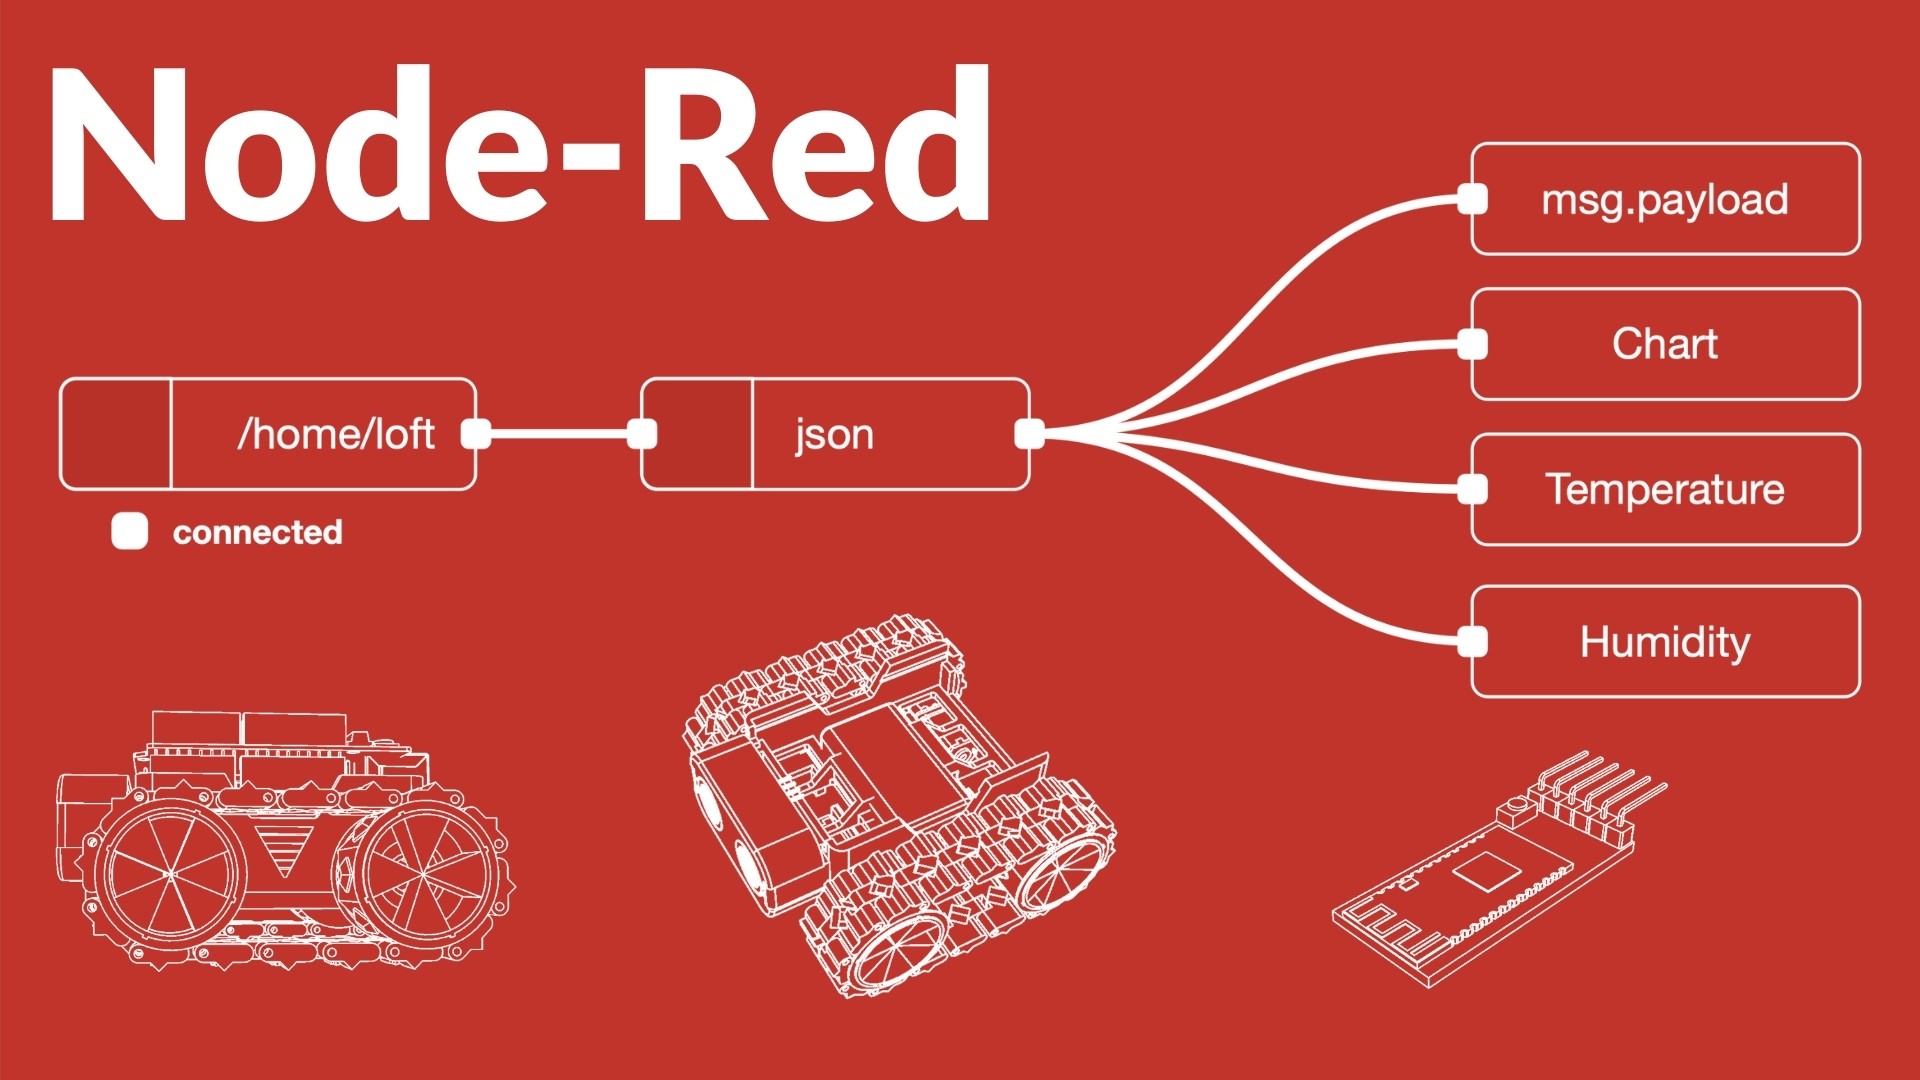
We’re then going to pass the data which we receive to that particular MQTT node. So we were subscribed. We’re getting some data in it’s going to be an a JSON format, so we might want to split out to make it more of a native object. We can look out and we can pass that. And I’ve got on the screen four different types of node.
We will have a look at these interactively on the demo in a minute, but we’ve got something called message dot payload. And that’s a debug node, so we can have a look and see what’s actually happened in those messages. I’ve got a chart, a temperature and a humidity dashboard widget. So that’s going to build a dashboard and I can access that through my computer and see what the actual temperature is in a kind of nice graphical way, rather than just being a pure number.
We’ll have a look where all that data is coming from in our little weather station as well.
How do we connect MQTT home kit? We have a couple of options there. One is HAP-NodeJS hap stands for home kit, accessory protocol, node JS. And that’s what I’m actually using. Again, open source, very simple to do.
I downloaded the code from Github , and then just run it straight on my device. I configured a couple of accessories, which is how this is presenting the data to my phone. So I can see on my home app, what the temperature is from these homemade weather stations. So it’s very easy to pair that up and we can see on the screen that there’s a QR code, one of those funny digital diagram things, the QR code, it means that I can just point my home app at the screen.
And it will pair with that particular device. If you’re trying to do that on this, it wont work. Cause you’re not on my local network, but the little texts. Yeah. It says what the key that you need to type in potentially and other information as well. Okay. So that’s how we add that’s how we get started with bridging the gap between home kit and MQTT.
So we can take those messages from our weather thing. We can do something with it in the Apple home ecosystem. And to add accessories to home bridge, there is a tab on there. You just click on that. You can then add extra accessories in there, and they’ve got a whole load of everything you can buy.
They probably got an accessory for that. You just click it, configure it, and then it’s part of your home kit installation. So you can then do things with it. If you buy a nest camera, for example, that isn’t part of the Apple eco system.
We can use home bridge to bridge the gap between those different ecosystems and bring devices that don’t necessarily have apps. To talk to each other. So that’s a pretty cool thing. These things can be a bit fiddly at times, the actual accessories and it’s down to who’s room and how good that is.
So your mileage may vary with that, but actually pairing with the HomeBridge very trivial to do. I’ve got the up and running in about half an hour.
HomeBridge connects things to Apple’s home kit platform. It runs on raspberry pi’s on macos windows, Linux, all the things.
And there’s a link on screen there, which is github.com/homebridge/homebridge. And then there’s the wiki page on there as well. If you can learn all about it, it’s very simple to get working on a raspberry PI and that’s the route I chose.
If this, then that, what is that? So if this, then that is an app you can subscribe to I believe there’s a free tier where you can build three apps I’m on the paid one.
It’s not very expensive. It’s about three to five pounds. And that means you can build a lot more than three apps. So I’ve got apps that do things for me not to do with robots in this case, but things such as when I go live it’s listening to an event on YouTube for any, anytime I go live.
And that will tweet about that. It will Instagram about that. If I Instagram a picture, it’ll tweet the picture. So it helps us do a lot of the things that I would have to do by hand. And it’s very extensive in how it can do that.
We’ll have a look at that as well. I’ve got some Examples where we can have a look at that on my account.
You can connect all the things together and similar to what we can do with Node-Red. This can of off those things from Node-Red and then do them on the internet. So if you want to have a Google doc spreadsheet I don’t know, convert that and save that into a Mongo database.
It can do that kind of thing for you. The number of things it can do are just vast but just think of it as a sequence of things that can happen based on a number of integration blocks that you can plug together. It’s very easy to set up.
Now, what we need to do is we need to go to github.com/marcelstower/nodemcu-pyfla sher and. You might be able to do this in Thonny, but this is the route I use, I downloaded this code created a little virtual environment for my Python.
Just that any specific libraries to do with that at the instruction role on the site, if follow that very straightforward to get that up and running. And there’s little user interface, which I’ve got on the screen there, which shows you, you can either select, the serial port, or you can just let it auto detect.
You download the firmware from micro python.org. And there’s one specific one for this chip, for the node MCU. We’ll have a look at that if you want to, and you’ll get a little file that you can then use this interface to flash. So you’d just select it there with the browse button, leave the baud rates and everything as they are you can select erase flash if there’s a program already on it. And then you just say flash and it’ll take maybe 30 seconds and then you’ve got micro Python running on your little chip. That’s node MCU and how we get it on there. And then the little slide that I wanted to go over.
This is the little weather station, and I can show you this on the overhead camera as well in a second. So they know what MCU that we talked about has built in wifi. That means it could go anywhere in my house. And as long as it’s got power and I use a USB phone charger just to power, it doesn’t need very much power at all.
I’ve used micro Python to create the code for this, and we can have a look at that shortly. And I use the node MCU PI flasher tool to get micro Python onto the chip. And the little program that runs on this simply takes a reading from that little white device.
This little white chip here, this is a DHT 22. That just spits out readings on one of the pins. And we just use our node MCU to take them readings and then package them up and send them to our MQTT server.
And we package them up into a little JSON block that says, here’s the temperature. And here is the humidity. And when I thought on I’d included a third one, which was, and this is in this location such as like the loft, the whole, the summerhouse, wherever. So you can use any of those. And you can see from the diagram, it’s literally just a couple of pins and a breadboard.
This is not a complicated device to use. And these are all off the shelf components. I’ve not done any soldier in these are just had a, is pushed in with jumper wires. And then I’ve got a little black project box that I bought from a shop online, and I’ve just put it in there just to make it a bit more robust.
But it’s pretty crude. As you can see there. I’m just showing on the overhead camera now as well. That there’s the box on the bottom. There’s a little sticker that says bedroom temperature sensor, and that lid to just goes into that project box and just keeps fluffing dust from getting in there
That’s our little device, a little weather station, you can get them that detect temperature as well as pressure and humidity. Believe these ones do all three.
Demo time.
My favorite time let’s get over to the raspberry PI.
I’m using a VNC to connect to a raspberry PI and what I want to show, first of all is. So if I click on the the raspberry PI start button, I go down to preferences. There is a, an option there called recommended software.
If I click on that it’ll load up this little dialog box that shows me all the available software that the raspberry PI organization recommend that we install on our raspberry PI it doesn’t always automatically install them when you flash the memory card from raspberry PI. But there are certain packages that they would say, this is the best one that we think is available.
So for example, if you want to do word processing and spreadsheets, they have the Libra office. So Libra office is one of the recommended things . We can just see, it’s got a little tick box next to it. And if I scroll a bit further down, Node-Red is there as an option. And if you click on that little box there and then click, okay, click apply, it will start installing that for you.
It’s very easy to get this installed off the bat. And we can see, we’ve also got things like Thonny and visual studio code there as all recommended pieces of software. So what’s a bit misleading. There is I’ve actually got Node-Red running on this, but I didn’t install it through their recommended things.
So that’s why it hasn’t got the tick, but it’s actually running on this machine.
If I go to my PC, what we’ve got on the screen at the moment is We’re connected to our Node-Red server.
So you can see that it’s got the IP address. One nine two one six eight one.one 60 and that’s on my local network. And then there’s a little semi-colon in the address bar one eight, eight zero. And that’s what port this is running on. So you could potentially have multiple versions running on different ports if you had a fast enough machine.
So as we can see on the screen, we’ve got the layout, like we described before, we’ve got the node pallets on the left-hand side in the center. We have our flow, which is on a tab I’ve called this one weather station. There’s another tab there I can click on. And that’s an empty one at the moment.
And then on the right hand side, we’ve got some different panes to shows things. So at the moment, I’m on the info pane and we can see that there is little tree diagram of things. And this is actually the dashboard that we’re going to create. We can also look at there’s a debug messages there, and I can see if I wire this little home loft node directly into the message pane and click on the deploy button. It’ll now start spitting out even more things to our message dot payload. And we can also do that from the hall as well, just in case we’re not getting any messages from that other device and what will happen.
There is any messages that are being sent to those two topics will appear here. So I can see now I’ve got a message thats just come through and it’s on the topic slash home slash temp slash hall. And the payload is a JSON object. And I can see in there, it’s got the word temperature. Semi-colon 26.70 and then it’s got humidity 41.80, and several other messages are coming through with pretty much similar output.
That’s great, but we can’t do anything with that yet. So that’s the raw data that’s coming from these MQTT nodes so if I double click into one of these and we can have a look what happens. I’ve just double clicked on the slash home slash loft MQTT in node.
And on there, I can see that the server that it’s connected to is called MQTT server. And we will actually go and have a look at that in a second, running on the raspberry PI on a different machine. The topic that it’s listening to is slash home slash loft and. I can see there, why that’s not getting any data?
No, actually that should actually be slash home temp slash loft temp for temperature. There’s a thing that says Q O S that’s quality of service. So you can prioritize messages based on this quality of service. If you want to make sure that message always gets through ahead of other ones and bubbles up the queue faster, for example, that’s what that QoS is for amongst other things.
And then output, we can say what do we want to output this to the next node along the tree? I’m just going to say just auto-detect it, leave it as it is. You can give it a name if you want to. I’ve just left it as it is. So if I have to do that I need to now deploy that because I’ve just changed it.
If I just clear the the debug as well, I can now see that I am getting messages now from the loft as well as the hall. So I’m getting two lots. I’m getting temperatures both loft on the hall. And we can see that message payload lights up when it receives a message.
But every now and again, I also get one of these unexpected token N in JSON at position 15. And if we look at the message below. Where it says temperature, it says N a N. And that means not a number . For some reason, I’ve asked for a number from the temperature sensor and it hasn’t given me one.
So it’s just spitting out whatever it’s getting. There’s no kind of error checking on there. I could probably have done a better job and actually creating these in the first place. But these have been running for about two or three years. And these are not been created in micropython.
These were created in Arduino IDE using C, but as you can see, it’s working pretty reliably. We can plug that in a second to our dashboard So that’s the first Node then. And these the hall one is exactly the same, but instead of being home slash temp slash loft, it’s home slash temp slash hall, but apart from that’s exactly the same.
And then we have a JSON node. So if I double click on that one, it says on there, the action is to convert between JSON string, and object and the property that it’s converting it is the message payload. What I’m going to do now, I’m going to delete those inputs to the message payload debug thing.
And I’m going to wire, the the JSON node into the message payload. So just to have a mental look, to see on the left-hand side, you can see we’ve got little speech marks. We’ve got a curly brace, we’ve got the word temperature colon 24 and then humidity. So I’m going to deploy this and this is going to change what they now look like.
Now that they come through, just ignore that Nam one for a second. And I’ll also pass that one there. We’ve now got an object we can look at. So instead of it just being a string of text, it now understands that this is an object it’s a JSON object, and it’s called them in differently. So we can actually expand them and we can work on them.
We can individually reference the temperature or the humidity. So that’s what that JSON node is doing. We can split out now those two things. So I’ve got on the right hand side, a dashboard node for a chart. If I double click on that. It’s got a couple of properties. Top to bottom, we have group.
And that’s what group on the dashboard is it gonna appear in? Ignore that for a minute. We’ve got things like size. We can say how many units wide, this is on the dashboard. What type is it? It’s a gauge. We could have a donut or a compass or a level. The moment it’s just a gauge. There’s a label which is temperature.
The value format is messaged dot payload dot temperature. Remember before I said, the first note is just spitting out a string of text. The second node, the JSON node is splitting that out into objects. So now we can say message dot payload dot temperature. And from that node, it knows exactly what we’re talking to.
The units is just units. We could change that to be if it’s temperature Celsius, for example. So it could change that to degrees C and then there’s a range. Because this is going to be a chart, we want to be able to specify what the access of that chart will be. So I have said minus 20 degrees to 50 degrees Celsius, that should be more than enough.
And then there’s a color gradient from green, yellow to red, depending where it falls in that range. I’m just gonna click done on there and deploy. And now what I’m going to do, on the dashboard button, we can see the layout of the site. There is some groups there’s a hall group and a loft group. Actually we can get rid of that one. There’s nothing in that one. Someone’s going to edit that and delete it. And I’m just going to rename that one there to be home. So I’m just updating some of the nodes there just to make it look a bit better.
I’m going to deploy that. And the top right there, there’s a little breakout, what, and this is actually going to load up the dashboard that we’ve just created. Enable it update, deploy it.
And now if you go back to that page that we just looked at. We’ve now got some widgets on a dashboard. So the dashboard has got nice blue header that says home. And then there is two groups. There is hall and loft, and each of them has got a little chart on it. So there’s a humidity chart and a temperature chart.
And the humidity chart is going between zero and a hundred because that’s the right range for humidity. So it says the hall is 41.2, whereas the loft is 42.7. So it’s slightly more humid in the loft. And that’s probably because it’s raining at the moment and it’s closer to the rain.
So it’s getting more of that humidity coming through and then temperature wise. And this is what you’d expect. The loft is quite cool. That’s 20.5 degrees C. Whereas in the hall it says it’s 26.8. I don’t think it is actually 26.8. But it might be next to something that’s quite warm in there. I would take that with a pinch of salt, but we can see that there is a difference between the hall and the loft.
And we can also see that these are beautifully rendered. All we need to do is just go to a device if I try loading this up on my phone now, for example. If I go to one nine, two, one six, eight.one.one 60, okay. And then call on one eight, eight, zero, and then slash UI. You can see I have exactly what we have on the other screen, which is those two donut charts. And that’s live. I can see that right away. So that’s an example of how to build a very quick dashboard in Node-Red.
If I go back to the node interface, so there’s just two sets of things happening on here. One is for the the loft and one is for the hall. So let’s build one of these on flow on. So what we will do on the left-hand side, we find the network pallets area.
And there’s an MQTT in, so I’m going to drag that across onto the pane there. And it’s got a little red triangle, which means that it needs some configuration that we’ve not done. So if I have double click into that, it knows that the server is the MQTT server, because that’s the only one that’s available , but it doesn’t know what topic we should listen to.
So I’m just going to do hash and hash means all the topics. It’s like a wild card, like star is when you’re doing searches quality of service going to leave as two output. I’m going to leave as auto detects. And then the other node I’m going to put is the debug node. I’m just going to wire the two together and then click deploy.
Now if I go to the debug pane and I just clear that we’ll see lots of messages coming through and not just from that hall sensor. I’ve also got on my network a 3d printer which uses . Octo PI to manage all the print jobs and that spits out loads of stuff on the MQTT server.
So I can check to see, what the current status of a print is, is it 70% through? I could then make that connect to a nodeMCU, that’s got a nice screen on it. That’ll show the percentage and I could just have that somewhere. Maybe take it with me and plop it next to me so I can see how far the print job has gone.
So you can see the potential for doing interesting things with node-red. Very simple to use and it’s just a matter of plugging one node into another and configuring them correctly. So if I look at some of the other things that we can do, we can create comment nodes.
They don’t do anything. They just record a comment, just like a comment in regular code. We can do all kinds of different functions. There’s lots for switching values, all sequences of messages. We can select a range, which filters things out in effect. We can have a delay. So if a message comes in, we can get it to wait a certain amount of time before sending it on.
And we can trigger things as well. We can say after three messages have been received, then trigger an event. For example, we can execute arbitrary scripts. So I could create a Python script, for example, that is executed by this execution node. We can create random numbers. If I just feed that into the message payload that will just create random numbers within a range that we specify then we’ve got MQTT out so we can write messages back to the MQTT server based on some event that’s happened.
I could create a button on the dashboard that when I press that it sends message to the MQTT server and maybe our robot responds to that. So we could create a dashboard for controlling our robot, up, down left sends different messages to our robot on particular topic.
So you could have a range of robots all on different topics. So there’s an idea. And they’ve got other things as well, HTTP requests. So you can build web pages, API APIs. With this, you can ping servers, you can play audio output, you can split join sort or batch particular sequences of messages.
Then you’ve got parsers. I was talking before about outputting things. If we want to output all these messages to a CSV file, we just plug in that node to that node, double click. We say what the file is called and it will just start output into a file on our file system. We can create data log very trivially in this.
If we wanted to save this to a database, all we would need to do is bring the database plugin in. So what I’ll do, I’ll click on this button here and go to manage pallet. And we can see here we’ve got nodes and installs, nodes are the things that we’ve already got installed. Whereas install is the library of things.
So for example, if I want to save to a Mongo database , I can see that there is a Node-Red Mongo DB node, and what I will look at when I’m trying to evaluate, which is the one I want to install. Cause there’s several on the screen. I’ll look at how old they are as in, when were they last updated.
And I will also look at what version number they’re on is any of that. There’s one that’s version two. There might potentially load that one in, and that one’s only a year old. Some of these are like four years old. That one’s last, there’s two months old. So I’m going to go with that one. So if I install that click install, it’s going to go in the background, grab that from the repository, install it locally, and then we’ll see Few nodes appear. So we’ve got a Mongo DB out, and a Mongo DB in added to the pallet there.
If I now look on the left-hand side at the very bottom of our list, we’ve now got Mongo database in a Mongo database out. The Inn requires us running Mongo DB.
So I’d have to install that separately somewhere else. But Mongo DB is quite good database. If you want to very quickly get one up and running.
Just scrolling down the list of pallets on the left-hand side against we’ve got a raspberry PI area. That’s got the GPIO in GPIO out it’s got the mouse and the keyboard.
And I think there are some other ones that you can install as well.
The dashboard area is where we’ve got all the nodes for the dashboards. We’ve got buttons, dropdowns switches, sliders, numeric inputs, text imports, date pickers, color pickers a form to put all these in. And then we’ve got outputs, text outputs, gauge, outputs chart, audio outs, notification, that sends a notification by the browser, and then we’ve got template as well.
So you could create a template using some HTML and CSS, and it will apply that template to your particular dashboard. I think that is all the ones I’ve got installed. So that’s a quick whistle-stop tour of Node-Red, and we can see that they’ve got some real data coming in from the sensors.
This sensor is actually running as we speak. This one is plugged in. This little blue light is on
and there’s the temperature sensor pressure sensor. And it’s just got a way of coming from the ground. The black wire is ground. The orange wire is from the five volts. And then there was a blue wire, which is the data pin. It just has one pin there going to pin three, on the note MCU and that’s just happily collecting data and just spitting it out.
So if we go back to our node that’s called loft one. That’s called hall. And then there’ll be another one that’s called bedroom. That one, their bedroom is this device that I’ve got on here. , I can essentially just duplicate all these by dragging them copying and pasting them, and then copying those three cut and paste in them.
And then we can just join them all back up as well. And what I will do is I’ll just edit for that first node. So instead of being hall it’s then bedroom update that deploy confirmed deploy. And if we now go to our dashboard, we should now have a extra set.
We’ve got a couple of extra ones and they’re reporting the temperature in here as being 21.9 degrees, which is pretty much bang on what it is .
That’s Node-Red I’ll show you if this, then that, so this is my, if this and that account, and I’ve got a couple of I’ve got 10 apps that I’ve got currently running there.
If there’s a new stream started by me, it will then tweet to kevsmac. If I like a video, it’ll send the rich notification to the IFTTT app. That was just me testing out. It will tweet my Instagrams as native photos on Twitter. I send out pictures maybe every other day on Instagram, , tweet your Instagrams as native photos on Twitter.
Posts your Instagram videos to Twitter. If I get a new follower, I get a rich notification . If new public video uploaded, post a tweet with image to kevsmac.
And if somebody likes one of my videos, then it, again, it posts a tweet that somebody liked my video and I will get an email if it rains tomorrow as well.
To create these, we just click this great big plus button here. The interface on this is designed for mobile devices. Look the size of that, if this, and then you add the first thing and I’m going to scroll down, just look how little the scroll bar has moved, given how many things are on there.
There is loads of these, so you pretty much need to come ready, prepared for what kind of integration you want to do.
Let’s scroll up and let’s say, for example google assistant, Google sheets, Google docs, Google drive, let’s do a Google assistant. We can say a simple phrase or say a number or say a phrase with a text ingredient.
Let’s just pick the simple phrase. And then it’s going to ask me to connect to Google assistant. So I don’t want to do that on this particular show, but you can see how you click on a block and that’ll take you through to build a particular set of options that you can use. And then you can.
You can do something with that. So if this if an event has been triggered then that, so then that is that the next step in the process, like the tweet, the message, or save the file or do whatever.
That’s similar to what we can do in Node-Red with the nodes, but this just uses a different approach and it’s available through the world wide web or wherever you are in the world.
HomeBridge, this is the HomeBridge server. So I’ve got a few bits and bobs running on here, so there’s that great big QR code? I can go to the accessories. I can let’s go to configuration actually and find an accessory that we want to plug in.
Let’s search for nest camera. it’s going to see, so there you go. Home bridge, nest camera. And if I click on that, it says it’s verified. So we assume it’s good. We can click install. It’s going to do all the stuff in the background that it needs to do to configure that.
And that plugin will then be available to configure. I’ve not done a great deal of configuration on these, but they do work very reliably, very well.
If you get some cheaper cameras rather than the official HomeKit ones you can essentially just plug these in. You could get a raspberry PI with a camera built-in and pull that into your network as a native camera that goes by your home app. So that’s HomeBridge .
On here, this is what I downloaded from git hub from the node MCU PI flasher repository from the person that I mentioned before and then because this has got a requirements dot text file.
That tells me that we can, we should be using this with a virtual environment. So you can see when I’ve just looked into that file. There’s a couple of different things that it wants to be installed. I’ve already gone ahead and created the virtual environment, but the way that you would do that, you would type in Python three and then dash M and then you type in VENV, virtual environment.
And then the name of the virtual environment. I usually just use the same thing, VENV, and then source venv bin activate, which activates that particular virtual environment don’t worry about this. If this seems a bit high level it doesn’t really matter too much. There is instructions on how to do this, and then I’m just going to do Python and then node MCU dash PI flasher, and that’s going to run the PI flasher module.
So there we go. This is the interface. I’ve got a node MCU plugged into my computer, ready to go. don’t know whether this one is going to work. It’s going to, if it’s going to play good with us, but let’s go ahead and see if it works. So it has detected it on a serial zero, zero one.
It’s asking for the node MCU firmware. So I’m going to browse into my downloads folder. And I think on here I have actually got a micro python so I’m just trying to find that we’ve got ESP eight two, six, six dash, and then a date dash bin. Let’s open that one and then that’s flash our node MCU. And that flashed up it’s got a little led lights on it that showed some activity at the moment on screen, it just says it’s uploading stub it’s just waiting for that to complete. Once it’s done that we should have micropython installed in our little device. Interestingly it detects things like, the chips speed, how much memory it’s got on there.
I think this one has got four Meg of flash built-in.
Let’s go and have a look at that code that we wrote to connect to the MQTT broker. So I’m going to go into documents and then I’m going to go into the micropython area. So I’ve got folders for micro Python, Arduino and for web stuff as well.
And then there was one that’s called node MCU wifi, and there’s three parts to this file where there’s a boot and main, and this U MQTT simply dot PI. That’s the library. Now the thing with micro python is unlike the Arduino, where, when you’re compiling your code, you’ll input the libraries.
When the compiler compiles that code, it bundles everything into the output hex file. That’s going to generate micro Python doesn’t do that because it doesn’t actually compile it and then load it. It’s an interpretive language. So it will look at things. One thing at a time very quickly, but one thing at a time from a file.
So it doesn’t compile anything in that sense. And that means that we have to have those three files on the device itself rather than having them bundled into one area. Let’s have a look at the boots dot PI for a second.
This is the Thonny interface and I’ve got a couple of lines of code there. So I’ve got import time from uMQTTsimple import MQTT client. So that’s going to represent our MQTT client stuff. Then we’ve got you bin ASCII. We’ve got machine, we’ve got micro Python.
We’ve got important network import ESP, and then import GC for garbage collection. GC dot collect that clears up anything that’s in the memory. And then there’s a couple of variables there. So we’ve got SSI ID for the wifi name. So that’s where you would type in your wifi SSI ID.
The thing that you connect to the password for the wifi, the MQTT server we’ll have look at my MQTT server in a second. But that’s essentially just either a name or an IP address. The client ID is just the name that you want to give this particular device. It can just be random, but yeah, it doesn’t really matter what that is.
As long as it’s not the same as something else that’s already on the network. And then we have sub and pub that’s our topic sub is b’notification and topic pub is b’hello. So it’s gonna subscribe to notification, but publish to hello. And then it’s got a couple of variables for something to do with messaging.
So there’s last message, interval, counter. We can ignore them. And then this is the code to connect to the wifi. Look how simple this is. Station equals network dot WLAN and then network dot sta underscore if. That’s like the station interface and then station.active, true station dot connect SSI, D password.
And then it says, while station is connected, equals false, do nothing pass. That piece of code just keeps you doing nothing until you get a connection. Once you get connection, it says connect dot successful. And then it’s just printing out the station IP address. This code doesn’t do anything further at this point.
This is just an example of what you can do there. So that’s the boot PI and boot PI is when you switch on a micropython device on a battery this is the first piece of code. It will run. It’s analogous to in Arduino speak the setup piece of functions. So you have set up and then you have a loop.
So this is like the setup area. Then we have main dot PI and that’s like the loop in the void loop in Arduino. So this has got a bit more stuff in there. So we’ve got a couple of functions, one that’s called sub CB. And then it will, it takes topic and message as parameters. It prints out the topic and message, and it says if topic equals b’notification message equals received, then print ESP received. hello message.
This is just testing that you received something. There’s another one that says connect and subscribe. What this function does here is it will connect to the MQTT server and it will tell us that it’s connected and it will return a client, which is just like an object and MQTT object that we can use it in the rest of our code.
And then there’s another one , restart, reconnect. So if it fails to connect it, basically just restart the whole machine. So that will then reload the boot dot PI and then come back to this piece of code. And then there’s it says true client dot check message. If time dot time is minus the last message is greater than the message interval.
So this is a way of limiting the number of messages you receive, because it might be you try and check too many times and then it causes a problem. And I actually came up against this with the code that I’d written, the really crude code that I’d written for the the fan and the heated mirror in the bathroom.
I didn’t have anything like this, so that when a message was received, I would hear the relay in the the Sonoff clicking on and off very quickly, thousands of times, a second kind of quickly. And that was because it was running through a piece of code like this, but without any kind of brakes on it.
So this is quite a sensible piece of code to just limit how many messages you get through in a particular message interval. And it’s publishing to particular topic and then it’s just incrementing a counter and that’s all that piece of code is doing there, but that’s the block of code there is where we would put our messages to send to that topic.
So we’ve got one to receive and one to send.
It’s very simple to use this micropython. That library. We can have a look in there, but that’s where all the sort of magic happens on this is from somewhere else on the internet.
That’s how we create some code, put it onto our node MCU.
So it could, for example, get the temperature, the publish that to a topic, and then we can receive that into our MQTT server.
I’m going to connect to the MQTT server, this little terminal window is connected, one, five, two is the IP of my. MQTT server. So I’m just going to type the word screen and I use screen
I use the screen command if you’ve ever used that on terminals. It’s a way if you have a session running, so say on my Apple Mac, I have a terminal open and I’m connected to my MQTT server and I’m doing stuff I’m running some processes. If that connection gets broken, that terminal will cease to exist on that server and stop running, whatever I’m running.
So sometimes I want things to carry on running, even though I might have disconnected and the screen command can help you do that. So you just type the word screen in. So screen dash LS will show me all the different screens that I’ve got running.
And if I do screen. And then dash capital R, and then the number of the server. I want to connect to so im going to type two nine, four, five, eight. This has actually stopped running. So I’m just going to show you what’s going on here. I have two processes that run on This MQTT server, the first one is called mosca or mosquito, and that’s the actual MQTT server.
If you install mosca or mosquito, that does all the brokering, that is the server, the message queue itself. It never saves these it’s simply, it’s just a messenger in between. So you pass it a message. It checks through who’s subscribed to that and passes the message on and that’s all it does. It doesn’t do anything else.
So it’s very simple to use. I’ve got command there called mosca and then piped into bunyan. That just gives it a nice coloured output and then on another terminal, I’ve then got hap node JS, which is that HomeKit application protocol node JS thing. And if we look in this folder that we’re in.
He can see I’ve got some accessories, I’ve got core dot JS. So if I go into the accessories folder, I can see there that I’ve got a loft temp dot JS. So if I do cat loft template JS I can see that the code which is just JavaScript code to connect to the MQTT server and then output that. To this hap node jS And that then passes it on to HomeKit and all that integration there. So if I run this, if I just clear that I go back down a folder and I do node and then core dot JS, that’s now going to connect. I can see messages there. So it says starting connecting to MQTT server. And then it’s Alex lamp fan connected Jen bedside, lamp mirror connected, summerhouse sensor connected.
And then it’s telling me about the temperature messages that are coming through. So they’re the exact same messages that we can see on our MQTT server on that Node-Red thing that we looked at earlier, they’re the exact same messages, but then that’s passing that through. So if I load up my Apple home kit here if I go to the.
Bathroom for example I will see that there is a couple of devices on there. One is the mirror, one is fan, and I should see that they get a status on there as well. And that actually comes through. . I can see there’s like various little tiles on here and I can see there that there , heated mirror off and fan on or off. So if I click that you can see that turning fan on turning fan off and , if I press this, you’ll see those messages appear on the screen fan on fan off. And that’s what all this stuff that we’ve built is actually working.
So I can press a button on my Apple home kit device. I can talk to the voice assistant whose name cannot be mentioned, because it’s right in front of me, that will pass on that message and it will activate whatever happens there. And this HomeKit bridge, this hap node, yes. Takes those messages, passes them onto the MQTT server that then publishes them as a message to the thing that’s running in my loft, little sonoff device, that’s got some code that’s listening to that topic.
And then that goes, Oh, fan off. And then it will switch the fan on or switch the fan off. So that’s how we can plug everything together. And I’ve got some other examples there. So this is another little thing I built, which is a little mailbox with a little flag. And if I take off the front of this and show you inside the little blue thing, there is a servos, it’s one of the SG 90 servers, and that’s connected to our little fan blade. That’s also connected to a node MCU. We can just see that peep in through there. If I gave this power we should be able to see on our server that this thing has appeared. So it probably just take a couple of seconds for it . To connect to the wifi network.
And then I can’t remember what I’ve actually called this, which would help. But we’ll be able to just send it to you, say, switch it up, switch it down and it will raise or lower the flag. So what I was thinking there is if I get an email, the flag could go up, but given I get thousands of junk emails a day, it’d be up and down all the time, but you get the idea.
You could have this. Maybe somebody rings the doorbell and this goes up or whatever. All interactive stuff.
So that was just a little fun project that I created. I found the thing on thinking verse and thought, Oh, that looks good. And what I could do with that. So that’s the technology, so I’ve got a couple of things running there.
One is the mosquito broker itself. And then I have hap node JS as the software that’s sitting between my Apple home kit stuff and all the rest of the home automation. And then Node-Red is just in addition to all that. So that’s another way of putting another user interface instead of the Apple home one, we can just have that interface instead and switch things on and off.
So it’s very easy to create a button on that dashboard that you can click on and off.
That’s all the things that I wanted to show you to do with Node-Red, hope you found that useful. And I don’t know if I’ve asked already, if you feel like this content, you find this valuable, please like on this live stream now that’s always good to do and subscribe to the channel.
If you’re not already subscribed and hit that little bell, just to make sure you get notified. When I go live, I’m going to put out the mid week video as well. And I’ve gone to be putting out things on Spotify Stitcher and iTunes. So all the podcasts locations and the way that I’m doing this, I’ve got a piece of software that’s called D script, and it will take my voice.
As you can hear it. Now, put it into text. I can then remove all those , filler words, it can just remove them. It just cuts out the audio, which is just. Mind blowing that it can do this. And then I’ve got some texts that I can very easily put into a blog post, and also the audio, which has got rid of all those awkward pauses and live stuff that you don’t mind hearing.
But when you hear as a prerecorded thing, you think maybe you shouldn’t say those things and you can cut all those things out very easily. So I can make a podcast repurpose this content very easily. So some people prefer to listen to things while they, I don’t know, doing household chores, commuting, if that’s still a thing.
And you’ll be able to do that by subscribing to the podcast on any of those platforms, Spotify, Stitcher, or iTunes podcasts.
So if you go to Spotify and you search out the robot show it’s nice red background you can see the robot show with Kevin McAleer so it’s the robot show, red button, little SMARS robot.
So hopefully you found that interesting. If anybody else has any questions For next week show, feel free to to reach out into the small robots group. Drop me a message there and yeah, we can take it from there. Hopefully you found that interesting today.
I’ve really enjoyed doing this one this week and we’ll see you next time. Thanks everybody. Bye-bye.