Lesson 07
Learn how to use the line follow module
LiveStream video
- LiveStream video
- What you’ll learn
- Downloadable Track PDFs
- Things’s you’ll needs
- Preparation
- Lets code!
What you’ll learn
In this lesson you will learn how to use the line follow module to make the robot follow along a line, or stay within a marked area.
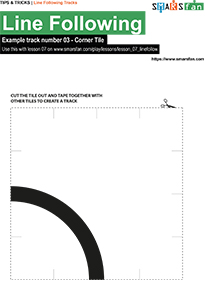
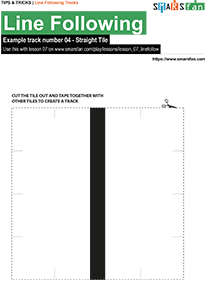
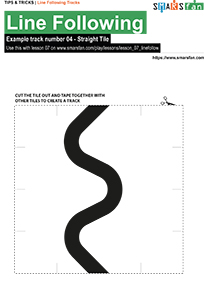
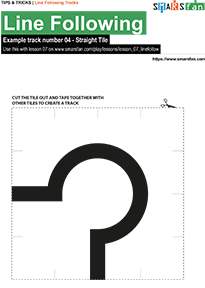
Downloadable Track PDFs
Download the PDFs here:


Things’s you’ll needs
- A USB Cable to connect to your computer
- A Computer that can run the Arduino IDE
- A line follow module
Preparation
- Connect the SMARS to the USB cable, and the USB Cable to your computer
- Launch the Arduino IDE on your computer
- Create a new Sketch, by clicking the
New Sketchbutton
Lets code!
/*
 * Kevin McAleer
 * 24 July 2020
 *
 * Line Following Code
 * See Lesson 07 for the full tutorial
 * https://www.smarsfan.com/play/lessons/lesson_07_linefollow
 * Watch the livestream video:
 * https://youtu.be/u9VT32q7ero
 *
 *
 */

// set the line sensor thresholds
int light_threshold = 650;
int dark_threshold = 300;
int lineNumber; // stores the line sensor value
int lineSensorPin = 4;


// set Motor A to Arduino Pins
int motor_A = 12; // official Arduino Motor Shield uses D12
int motor_B = 13; // official Arduino Motor Shield uses D13
int buzzer = 4;

// set the Motor Speed using the Arduino Pins
int motor_A_speed = 10; // official Arduino Motor Shield uses D3
int motor_B_speed = 11; // official Arduino Motor Shield uses D11

// set the time between motor on and motor off
int wait_in_milliseconds = 10;

/////////////////////////////////////
/*
 * Movement block of code, from the movement lessons
 * https://www.smarsfan.com/play/lessons/lesson_01_movement
 * https://www.smarsfan.com/play/lessons/lesson_02_turning
 *
 */

// move forward
void forward() {

  // set the direction to forward
  digitalWrite(motor_A, LOW);
  digitalWrite(motor_B, HIGH);

  // set to full speed
  analogWrite(motor_A_speed, 255);
  analogWrite(motor_B_speed, 255);

  // wait
  delay(wait_in_milliseconds);

  // stop
  analogWrite(motor_A_speed, 0);
  analogWrite(motor_B_speed, 0);
}

void backward(){
  // set the direction to forward
  digitalWrite(motor_A, HIGH);
  digitalWrite(motor_B, LOW);

  // set to full speed
  analogWrite(motor_A_speed, 255);
  analogWrite(motor_B_speed, 255);

  // wait
  delay(wait_in_milliseconds);

  // stop
  analogWrite(motor_A_speed, 0);
  analogWrite(motor_B_speed, 0);
}

void turnRight(){
  // set the direction to forward
  digitalWrite(motor_A, HIGH);
  digitalWrite(motor_B, HIGH);

  // set to full speed
  analogWrite(motor_A_speed, 255);
  analogWrite(motor_B_speed, 255);

  // wait
  delay(wait_in_milliseconds);

  // stop
  analogWrite(motor_A_speed, 0);
  analogWrite(motor_B_speed, 0);
}

void turnLeft(){
  // set the direction to forward
  digitalWrite(motor_A, LOW);
  digitalWrite(motor_B, LOW);

  // set to full speed
  analogWrite(motor_A_speed, 255);
  analogWrite(motor_B_speed, 255);

  // wait
  delay(wait_in_milliseconds);

  // stop
  analogWrite(motor_A_speed, 0);
  analogWrite(motor_B_speed, 0);
}

/////////////////////////////////////

int readLineSensor() {
  return analogRead(lineSensorPin);
}

void setup() {
  // set the Serial to 9600 baud and open it for comms
  Serial.begin(9600);

  // set the Arduino pin to OUTPUT mode
  pinMode(motor_A, OUTPUT);
  pinMode(motor_B, OUTPUT);
  pinMode(buzzer, OUTPUT);
}

void loop() {
  // Read the value from the line sensor (connected to the line sensor pin)
  lineNumber = readLineSensor();

  // move forward while the line sensor is white
  while(lineNumber > light_threshold)
  {
       Serial.println("move forward");
    // move forward
    forward();
     Serial.println(lineNumber);
    lineNumber = readLineSensor();
  }
   Serial.println(lineNumber);
  if(lineNumber < light_threshold){
    turnLeft();
  }
  else {
     Serial.println(lineNumber);
    backward();
    backward();
    turnLeft();
  }
  Serial.println(lineNumber);
}
This page was first created on 24 July 2020, and was last updated on 24 July 2020